Booktrackr Part III - The Initial Deployment
25 Apr 2016In this post we’ll set up deployment to Heroku for Booktrackr.
Deploy Now?!?
Wait, deployment? Isn’t it a little bit soon? The app doesn’t even do anything.
Well, you’re right that our app is a little bit light on functionality right now, but we want the ability to deploy quickly, frequently, constantly, and with confidence. As soon as a feature is complete and tested, we want the ability to release it so that we can see how users use it and iterate on it. We don’t want to spend a long time building something, going through a painful integration process to merge it, then going through a painful process to deploy it. In line with Part II about continuous integration, we want to integrate often and deploy often, preferably with small changes. Sometimes multiple times per day.
Businesses and developers have recognized the value of this model, and modern platform-as-a-service providers like Amazon Web Services, CloudFoundry, and Heroku have made it easy to do this.
So we’re going to get our deployment process ironed out in the beginning, so that we can release features as soon as they’re ready, and then update our release process as we need to.
Using Current Version of Spring Boot
I had not intended for this to happen, but it’s illustrative of one of the benefits of getting deployment ironed out so early in the development process. In Part I we picked a milestone release of Spring Boot (1.4.0 M2), which means it’s not a released version that the Spring team has certified as being release ready. So far, we haven’t had any problems with it, but in preparing this blog post I ran into some issues running the jar directly that I believe are related to the versions, so I rolled back to the latest release version of Spring Boot, 1.3.3, which solved the problem. (Running the application from IntelliJ and by using the Gradle Spring Boot plugin worked fine, but starting it from the command line using java wasn’t working right)
You can check out the diff for the commit to make this change here. It’s really only a change to build.gradle and some annotations on the only test. But, because we set up deployment now, this was an easy issue to fix because these features were not extensively used throughout the application. Had we waited until we were “done,” we could have found ourself with a mess on our hands.
Heroku
We’ll be using Heroku to host our app, but the principles apply to whatever hosting you go with. You can set up similar functionality with any modern platform like AWS or Microsoft Azure.
Create an Account
Go ahead and sign up for a Heroku account. It’s free to sign up and we can build our entire app using the free options for Heroku services and partners.
Getting Acquainted with Heroku
Heroku has excellent documentation, and you can follow their Getting Started With Gradle on Heroku Guide to to familiarize yourself with how Heroku works if you’d like.
Deploying Booktrackr to Heroku
There are a few things we need to do to prepare Booktrackr for Heroku deployment.
Add a stage Task to build.gradle
By convention, Heroku expects Gradle projects to have a stage task, so add this to build.gradle
task stage {
  dependsOn build
}
You can test it by running ./gradlew stage to verify it’s set up correctly.
Add a Procfile
Now we need to tell Heroku how to start our application. The Procfile is the way to do this. You can read more about the Profile here, but here’s what we need to set up:
web: java -Dserver.port=$PORT $JAVA_OPTS -jar build/libs/booktrackr-0.0.1-SNAPSHOT.jar
Since Spring Boot creates a runnable .jar file, that’s all it takes to start up our app. The $PORT and $JAVA_OPTS are environment variables set by Heroku, and the web: part just creates a process named web to run on Heroku. Pretty straightforward.
You can even test this configuration locally before you push it with the Heroku toolbelt by running heroku local web.
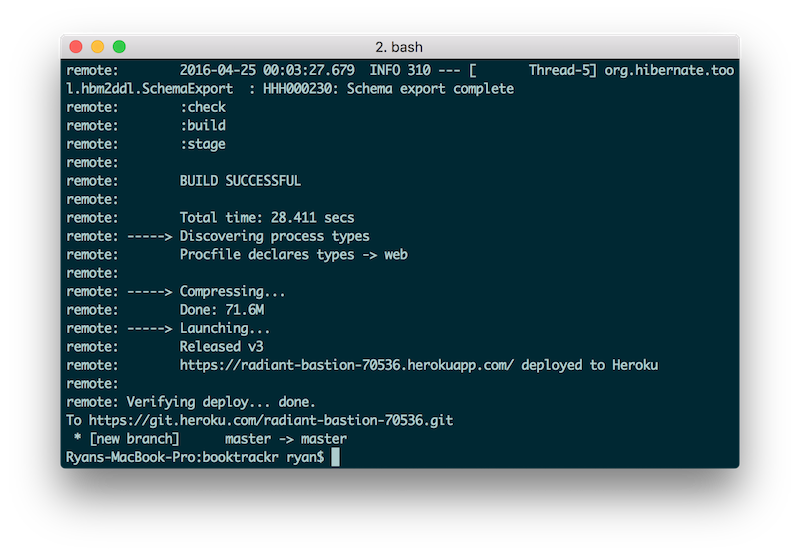
Push from the command line
Once you have your project working locally, go ahead and commit the new Procfile and push it to Heroku (git push heroku master). Make sure that if you’ve been making these changes in a separate branch, you merge them into master before you push to Heroku. You should see output similar to this in your terminal:
Interacting with the Deployed app
Our app doesn’t do much right now, so there’s not much to interact with, but there are a couple of ways to interact with your app after you’ve deployed it to Heroku. You can type heroku open to open up the app’s home page in your default browser, and you can use the command heroku logs --tail to view the logs from the application running on Heroku. We’ll get more acquainted with Heroku later on in the series.
Deploying from Travis or GitHub
Now that we know what’s going on under the covers when we deploy Heroku, i.e. that it uses our source code to build a binary executable and then starts it up using the Procfile.
Because it’s so easy to set up deployment to Heroku, it’s easy to deploy from a continuous integration server. Like Travis CI. So don’t be surprised when, later in the series, we set up Travis CI to deploy passing builds to Heroku automatically.
Wrap Up
In this installment of the Booktrackr series we set up our deployment pipeline and deployed the first version of our application to Heroku.
Part IV Preview
In part IV we’ll add our first domain objects and database schema migration.